Posts

Showing posts with the label Fan

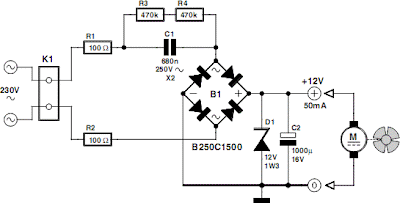
Ceiling Fan Regulator Motor Speed Control Circuit Diagram

Image
This is a simple ceiling fan regulator circuit diagram. It is used to control the speed of a ceiling fan. In the other words it is an AC motor speed controller circuit, as because it's control the speed of a AC motor(Ceiling Fan).  This ceiling fan regulator circuit built with few numbers of parts. The circuit mainly  based on Z0607 TRIAC. This is a low power AC semiconductor device. Generally which is used to controlling speed of low power ac motor speed.  Circuit Diagram of Ceiling Fan Regulator :      In this ceiling fan regulator circuit , R1=500KΩ is a variable resistor that is used to adjust the fan speed. Capacitor C1 2A104J is a Polyester film capacitor. Pin Diagram of  TRIAC(T1)- Z0607:  Fig: Z0607-TRIAC Pin diagram Pin Diagram of Variable Resistor R1: Fig: Pin Diagram of Variable Resistor Parts List Ceiling Fan Motor Speed Controller circuit: T1 = Z0607 -TRIAC D1 = DB3 C312 -DIAC R1 = 500KΩ -Variable Resistor R2 = 37KΩ -Resistor C1 = 2...

Fan Controller Using Just Two Component

Image
The Maxim MAX 6665 (www.maxim-ic.com) provides a complete temperature-dependent fan controller. It can switch fans operating at voltages of up to 24 V and currents of up to 250 mA. The IC is available from the manufacturer in versions with preset threshold temperatures between +40 °C (MAX6665 ASA40) and +70 °C (MAX6665 ASA 70). The device’s hysteresis can be set by the user via the HYST input, which can be connected to +3.3 V, connected to ground, or left open. The following table shows the hysteresis values available: HYST = Hysteresis open = 1 °C ground = 4 °C +3.3V = 8 °C Circuit diagram: Fan Controller Circuit Diagram The other pins of the SO8 package are the FORCEON input and the status outputs WARN, OT and FANON. The test input FORCEON allows the fan to be run even below the threshold temperature. The open-drain output WARN goes low when the temperature rises more than 15 °C above the threshold temperature, while the open-drain output OT indicates when the temperature is mo...

Ceiling Fan Repair Tutorial Part 2

Image

Junk box Fan Speed Controller

Image
My new home theatre receiver was getting rather hot in the close confines of its cabinet, with the temperature reaching over 40°C after only about 30 minutes of use. To help lower the temperature, I decided to install a fan in the cabinet. A 75mm hole was cut in the shelf under the receiver, and a 12V fan salvaged from an old computer power supply was mounted underneath. The fan was powered from a 12V DC plugpack. This did the job, keeping the temperature below 30°C even after prolonged use on a warm day. However, the fan was annoyingly loud when running at full speed. To reduce the noise level substantially, I built this fan speed controller with temperature feedback. The circuit was culled from variety of ideas found on various sites on the internet, with the final circuit designed from what was in the "junk box". Air temperature in the cabinet is sensed via an LM335 (TS1). It is glued to a piece of aluminium about 25mm square with instant glue, which is then attached to th...

Project of Bathroom Fan Controller Circuit Diagram

Image
Many bathrooms are fitted with a fan to vent  excess humidity while someone is showering. This fan can be connected to the light  switch, but then it runs even if you only want  to brush your teeth. A better solution is to  equip the fan with a humidity sensor. A disadvantage of this approach is that by the time  the humidity sensor switches on the fan, the  room is already too humid. Consequently, we decided to build a circuit  that operates by sensing the temperature of  the hot water line to the shower. The fan runs  as soon as the water line becomes hot. It continues to run for a few minutes after the line  cools down, so that you have considerably  fewer problems with humidity in the bathroom without having the fan run for no reason. Naturally, this is only possible if you can  fit a temperature sensor somewhere on the  hot water line and the line does not become  warm if hot water is used somewhere else. We use...

12V Fan Directly on 220V AC

Image
This circuit idea is certainly not new, but when it comes to making a trade-of between using a small, short-circuit proof transformer or a capacitive voltage divider (directly from 230 V mains voltage) as the power supply for a fan, it can come in very handy. If forced cooling is an afterthought and the available options are limited then perhaps there is no other choice. At low currents a capacitive divider requires less space than a small, short-circuit proof transformer. R1 and R2 are added to limit the inrush current into power supply capacitor C2 when switching on. Because the maximum rated operating voltage of resistors on hand is often not known, we choose to have two resistors for the current limit. The same is true for the discharge resistors R3 and R4 for C1. If the circuit is connected to a mains plug then it is not allowed that a dangerous voltage remains on the plug, hence R3 and R4. Circuit diagram: Capacitor C1 determines the maximum current that can be supplied. Above th...

Ceiling Fan Repairing Tutorial Video

Image

Remote Controlled Fan Regulator Circuit Diagram

Image
Remote-Controlled Fan Regulator Circuit Diagram . Using this circuit, you can change the speed of the fan from your couch or bed. Infrared receiver module TSOP1738 is used to receive the infrared signal transmitted by remote control. The circuit is powered by regulated 9V. The AC mains is stepped down by transformer X1 to deliver a secondary output of 12V-0-12V. The transformer output is rectified by full-wave rectifier comprising diodes D1 and D2, filtered by capacitor C9 and regulated by 7809 regulator to provide 9V regulated output. Any button on the remote can be used for controlling the speed of the fan. Pulses from the IR receiver module are applied as a trigger signal to timer NE555 (IC1) via LED1 and resistor R4. IC1 is wired as a monostable multivibrator to delay the clock given to decade counter-cum-driver IC CD4017 (IC2).Out of the ten outputs of decade counter IC2 (Q0 through Q9), only five (Q0 through Q4) are used to control the fan. Q5 output is not used, while Q6 output ...

Kitchen Exhaustion Fan Controller

Image
Exhaustion fan is a very important element in kitchens. Here may be a easy circuit to manage kitchen fans by monitoring the ambient temperature. it's engineered round the renowned precision integrated temperature sensor chip LM35 (IC1). remainder of the circuit may be a non-traditional electromagnetic relay driver wired round the fashionable LED driver LM3914 (IC2). User will switch 3 presetted temperature levels employing a jumper/slide switch (JP1), that determines the warmth level to activate the relay and hence the electrical exhaustion fan wired through the relay contacts. It works off 12V DC power offer. Kitchen Exhaustion Fan Controller  Circuit Schematic Only one adjustment is needed during this kitchen Exhaustion fan controller circuit. when construction, set jumper purpose in its 1st position, ie base terminal of T1 is connected to pin thirteen of IC2 and alter the preset P1 fastidiously in order that relay RL1 is energised when ambient temperature level reaches close to ...

Efficient Fan Speed Controller

Image
A partial solution to quietening noisy PCs can be to reduce the speed of internal cooling fans. Low-cost fan speed controllers are available, but they often employ inefficient, heat-generating linear regulators and contain no temperature feedback mechanism. This idea makes use of a readily available, cheap in-car mobile phone charger. The majority of these use common circuitry and require only minor modifications to operate as efficient fan speed controllers complete with temperature feedback. Most in-car chargers are based on the well-known MC34063 DC-DC switchmode IC. When used for charging mobile phones, the open-circuit output voltage is typically set to between 7V and 9V. This is achieved with a simple voltage divider across the output, the centre point of which connects to the feedback input (pin 5) of the MC34063. To make the output voltage var-iable with air temperature, first replace the upper resistor of the divider with a 4.7kΩ resistor in series with a 4.7kΩ trimpot. The lo...