Posts

Showing posts with the label DC

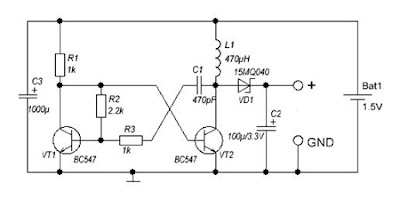
DC to DC converter 1 5V to 3V Circuit Diagram
Image
A DC-DC converter 1.5V to 3V Circuit Diagram to reduce the voltage is easy, but the situation becomes more complicated when we have to increase the voltage. This simple scheme generates a voltage 3Vdc from 1.5 VDC, which can be a single stack. We can get good results by modifying an multivibrator using two transistors, the frequency converter is approximately 130 kHz. The inductance value can be calculated experimentally. DC / DC converter 1.5V to 3V Circuit Diagram Schottky diode VD1 can be replaced by any other similar characteristics. For further stabilization of the output voltage can be placed one Zener 3V - 3.3V. This scheme can be used to feed a power LED device, a micro-controller, Arduino, etc. .. List of Components R1, R3: 1K R2: 2K2 C1: 470pF C2: 100uF / 3.3V C3: 1000uF L1: 470UH VD1: 15MQ040 VT1, VT2: BC547

24V to 12V 400W DC Inverter Circuit

Image
24V to 12V 400W DC Inverter Circuit Diagram 24V to 12V 20A 400W DC to DC Inverter. Does little to change my PV system 12v 24v me the problem arose of what to do with investors who already had 12V. I was looking for a pattern online and found several schemes with linear regulators 20A, this solution although quite simple, due to the huge losses they have is not advisable. Ideally, a converter switched, high-performance. At the end I found nothing I liked and decided to design my own. Circuit characteristics: Output current: 20A at 12V (15A continuous and 30A Momentary), Input voltage: 18 to 30V DC, Output voltage: 5 to 20V, Operating Frequency: 70kHz, Effectiveness: 95%, 400W maximum power, Protections: Above current (30A) in the F1 circuit, D1 and F1 polarity in the circuit.

DC to AC Inverter with IC CD4047

Image
This DC to AC inverter circuit work based on unstable multi vibrator does. In this circuit, IC CD4047 is chosen as a heart of unstable multivibrator, because this IC type gives a complementary output that has opposite phase to another ( pin 10 and 11 as seen in Figure 1), and has 50 % duty cycle that satisfy to generate a pulse for inverter. DC to AC Inverter with IC CD4047 Circuit Diagram

Regulated DC power supply

Image
Regulated DC Power Supply using transistors. A low ripple regulated DC power supply designed based on transistors is shown here. Such transistor voltage regulators are suitable for application where high output current is required. Conventional integrated series regulators like 7805 can only deliver up to 1A. Additional series pass transistors have to be added to the 7805 based regulator circuit for improving their current capacity. Description. The circuit shown below is a basic series voltage regulator based on transistors. Transistor Q1 (2N 3054) and Q2 (2N 3055) form a darlington pair. Resistor R1 provides the base current for Q1 and also keeps the zener diode D2 in the active region. The overall working of the circuit can be demonstrated by explaining two situations. When the input voltage (output of the rectifier section) increases, the output voltage of the regulator (Vout) also increases. This increase in Vout decreases the base emitter voltage of Q2 because the zener diode D2...

250 to 5000 watts PWM DC AC 220V Power Inverter

Image
Build a 250 to 5000 watts PWM DC/AC 220V Power Inverter  This is my schematic design of a Pulse Width Modulator DC/AC inverter using the chip SG3524 . I have built this design and using it as a backup to power up all my house when outages occur. If you like my work and intend to build the circuit don't forget to give me the 5 satrs :D and subscribe to me by clicking on the "follow" button so I know how many people benefit from the design, Thanks Notes: >The schematic circuit design is for a 250 watt output, while the pics are of my 1500 watts inverter that i built, to increase the power of the circuit you have to add more of the Q7 and Q8 transistors in parallel, each pair you add will increase your power by 250 watts, ex: to get 750 watts of power from the inverter you need to add in parallel 2 of Q7 and 2 of Q8 to the original design. >If you increase the power transistors you have to enlarge the T2 transformer to match the new needs, the circuit's ...

Simple But Multiple Output DC Converter

Image
This is simple and Low-cost Electronic Circuit Project of Multiple Output DC Converter Circuit Diagram . A DC converter circuit taking one single DC input and converting to parallel multiple DC outputs. Simple But Multiple Output DC Converter Circuit Diagram: Circuit Project Notes : This circuit uses a single DC input (nominally 12 Volt) and converts to four simultaneous output voltages of 9, 6, 5 and 1.5 Volts. The output voltages are controlled by common 78xx series regulators, offering 9, 6 and 5 Volt DC outputs. The 1.5 Volt supply is derived using an LM317 regulator. To reduce power and heat the LM317 is fed from the 5 Volt regulator output. The LM317 output is calculated from: Vo = 1.25 (1 + R1/R2) With R1 200 ohms (use 180 plus 22 ohm in series) this works out to be 1.5 Volt. F2,3,4,5 are the output fuses and are set at 500 mA (0.5 A). If the full 500mA is taken from each output then the DC input supply must be capable of sourcing at least 2 Amp. LED 1 illuminates to show the ci...

Simple 300mA DC to AC converter Circuit Diagram

Image
     This is the Simple 300mA DC to AC converter Circuit Diagram. This circuit was used to provide battery backup to a device that had an AC (output)wall transformer. Due to the quasi sine-wave output and imprecise 60Hz output frequency, some devices might not work pro perly. Peak output is the DC input voltage minus about 20 ohms drop. Use bigger output MOSFETS for more current output.[link]  Simple 300mA DC to AC converter Circuit Diagram

DC to DC Double Cell Phone Charger Circuit

Image
As we know now a days the main problem is charging of a cell phone when we haven't electricity . And this problem is getting bigger when we have more than one cell phone. So here is the circuit which can be solve our problem for charging more than One cell phone. This circuit of the double DC cell phone charger was successfully tried. The required voltages for the operating of this circuit is 12V DC from a battery source.The transistor T1 which we are using is PnP transistor.The general purpose of this transistor is power application e.g driver stages.The IC1 (7805) is a voltage regulator ic which we are using in this circuit. Parts List R1 = 0.1 Ohms 2 watt, R2 = 2 Ohms 2 Watt R3 = 3 Ohms 1 watt C1 = 100uF/25V C2 = 0.1 disc T1 = BD140 D1 = 1N5408 IC1 = 7805

Small DC Motor Control Using PWM

Image
Small DC motors are efficiently controlled using pulse-width modulation (PWM) method. The circuit described here is built around an LM324 low-power quad-operational amplifier. Of the four op-amps (operational amplifiers) available in this IC, two are used for triangular wave generator and one for comparator. Op-amp N2 generates a 1.6kHz square wave, while op-amp N1 is configured as an integrator. The square wave output of N2 at its pin 14 is fed to the inverting input (pin 2) of N1 through resistor R1. As N1 is configured as an integrator, it outputs a triangular wave of the same frequency as the square wave. The triangular wave is fed to pin 5 of op-amp N3, which is configured as a comparator. Small DC Motor Control Circuit Diagram : The reference voltage at pin 6 of the comparator is fixed through the potential divider arrangement formed by potmeter VR1 and resistors R4 and R5. It can be set from –6V (lowermost position of VR1) to +6V (uppermost position of VR1). The triangular w...

Build a 250 to 5000 watts PWM DC AC 220V Power Inverter

Image
Build a 250 to 5000 watts PWM DC/AC 220V Power Inverter  This is my schematic design of a Pulse Width Modulator DC/AC inverter using the chip SG3524 . I have built this design and using it as a backup to power up all my house when outages occur. If you like my work and intend to build the circuit don't forget to give me the 5 satrs :D and subscribe to me by clicking on the "follow" button so I know how many people benefit from the design, Thanks Notes: >The schematic circuit design is for a 250 watt output, while the pics are of my 1500 watts inverter that i built, to increase the power of the circuit you have to add more of the Q7 and Q8 transistors in parallel, each pair you add will increase your power by 250 watts, ex: to get 750 watts of power from the inverter you need to add in parallel 2 of Q7 and 2 of Q8 to the original design. >If you increase the power transistors you have to enlarge the T2 transformer to match the new needs, the c...

The Advantages and Drawbacks of DC to DC Voltage Converters with Integrated Inductors

Image
Such is the popularity of DC-to-DC voltage converters (“switching regulators”)––due to their high efficiency across wide input- and output-voltage ranges––that chip makers have focused a lot of research dollars on squeezing the essential components of the devices into modules. These modules typically include pulse-width-modulation (PWM) controllers and switching elements in a single, compact package, easing the design work for the engineer. However, until recently, it has proven difficult to include the energy-storage device (the inductor) inside the package. This has dictated that the engineer must specify, source, and design-in the inductor as a peripheral component, adding complexity and consuming board space. Now, a new generation of high-frequency switching regulators has enabled the use of smaller inductors enabling the devices to be housed inside the component vendor’s package. [ ]

Speed ​​Control of DC Motor PWM Circuit Diagram

Image
Speed ​​Control of DC Motor PWM Circuit Diagram. Often, people try to control small DC motors with a variable resistor type potentiometer connected to a transistor. This system until works well but it generates heat and thus loses power. This circuit is a simple circuit for modulating the pulse width for controlling the DC motor, it eliminates this problem.  Speed ​​Control of DC Motor PWM Circuit Diagram The circuit is capable of controlling the engine speed pulses (PWM), these pulses have a duration variable to change the speed of the motor. The longer the pulses lead, the faster the motor will rotate, and vice versa. R1 1 Meg 1/4W Resistor R2 Potentiometer 100K C1 0.1uF 25V Capacitor Ceramic Disc C2 0.01uF 25V Capacitor Ceramic Disc Q1 MOSFET IRF511 or IRF620 U1 4011 CMOS NAND S1 KEY M1 Motor  The resistor R2 adjusts the speed of the oscillator and thus the speed of the motor, the motor can be any DC motor that operates from 6V and having no more powe...

10W Power LED Driver using LTC3112 DC Converter

Image
Using the LTC3112 fixed frequency synchronous buck-boost DC DC can be designed a very simple high efficiency, high power led driver electronic project .The unique 4-switch, single inductor architecture of the LTC3112, provides low noise and seamless operation from input voltages above, below or equal to the output voltage.With an input range of 2.7V to 15V, the LTC3112 is well suited for a wide variety of single or multiple cell battery, backup capacitor or wall adapter source applications . Circuit Diagram The LTC3112 features selectable PWM or Burst Mode operation, an easily synchronized oscillator and output disconnect in shutdown. An output current monitor circuit allows the load current to be controlled or measured.Other features of the LTC3112 DC DC converter include : <1 br="br" current="current" short="short" shutdown="shutdown">circuit protection, soft-start, current limit and thermal shutdown. As you can see in the circuit diagram...

12 9 Volt DC to DC Converter BD139

Image
This circuit is a DC voltage output from a small DC input generate large voltage.It ‘s easy and quick to do, and reducing the value of the Z-diode, the circuit can be universally adapted to other output devices of the circuit voltages. The give and all diagrams represent a DC converter with 12V battery 9 volt DC input and output.     12-9 Volt DC to DC Converter Circuit Diagram With the 10V zener diode, as in the diagram, the output voltage is approximately 9.3 volts DC. The supply voltage is used, should always be at least a few volts higher than the Zener voltage. In this example, I have a 12 Volt DC battery to provide regulated 9-volt DC output.

1000W DC AC Pure Sine Wave Power Inverter Circuit Diagram

Image
DC-DC step-up part of the circuit RU190N08 Power circuit board SPWM drive plate TDS2285 IC

zBot 10 A Power Stage for DC Motor Circuit Diagram

Image
zBot :10-A Power Stage for DC Motor Circuit Diagram . If you look at the chassis of the zBot vehicle1, you’ll find two parts requiring intelligent control: the steering servo and the DC motor . The so called H-bridge is the normal circuit for electronic control of revolution speed and direction. The DC motor of a Tamiya car is powerful enough to propel zBot at up to 20 miles per hour. . The motor then consumes more than 10 A, so we choose high-current power MOSFETs for the driver stage. There are lots of different devices to choose from. The MOSFET we require has to supply the maximum motor current and, importantly, it has to be switched with gate voltages of about 5 V. In this case, the microcontroller switches the power stage (‘low side’) directly. For high side driving level shifters are necessary. The schematic of the H-bridge power stage shows a few inverters, NAND gates and two tri-stateable drivers. These logic functions are very important as the easier way, i.e.., directly con...

24V DC Powered Beeper with 4 Separate Inputs

Image
24v DC is a very popular voltage used in industrial settings. This hobby circuit below was designed to accept four different 24v DC alarm input signals, which are then used to drive a single low power beeper. The beeper is a magnetic type with its own oscillator/driver. The four diodes form an “OR” gate so any one of the four inputs will cause the beeper to make noise. A CMOS version of the popular 555 timer is used to strobe the beeper on and off at about 1Hz.   Copyright: Discover Circuits

3000 watt power inverter 12V DC to 230V AC

Image
  3000 watt power inverter 12V DC  to  230V AC Circuit Diagram of 3000 watt power inverter 12V DC  to  230V AC Fig. 2: Sine-wave voltage and conventional square wave voltage with both 230 Volt rms Fig. 3: Square wave voltage with duty cycle 25% for 230 Volt rms ("modified sine") PCB Layout: 3000 watt power inverter 12V DC  to  230V AC   Component Placement: 3000 watt power inverter 12V DC  to  230V AC fig.: output voltage with no load or inductive load. fig.: resistor 0,001 Ohm made of high-grade steel sheet metal Control electronics | 3000 watt power inverter 12V DC  to  230V AC fig.: control electronics on strip hole plate (previous version) and PCB of the "professional edition" Assembly of the mosfet-transistors on the heat sink | 3000 watt power inverter 12V   DC  to  230V AC fig.: heat sink, mosfet transistors, connections. Final assembly | 3000 watt power inverter 12V DC  to  230V AC fig.: 15...